


Here are a few tips to help avoid a nightmare.
Last year we decided to take the plunge. After six months of planning, a month of demolition, four months rebuilding – and approximately $50,000 spent on the project, we now have our new kitchen. Over the next many weeks, we’ll share with you my experiences in this three-part article hoping that what we learned may prove helpful if you’re considering a similar project.
Let’s start with our “after” photo first.

Bottom line; we love the end result. And because we spend so much time in that one room, our new kitchen is truly an upgrade to our lives. Yet the process was exhaustive and messy.
Thinking back almost a year, there’s no doubt, the most important first step (for us) was establishing the “vision” of what we wanted our finished kitchen to be. Our suggestion: Do all the visual research you can until you find your “dream” style. We actually found the look we wanted in a Google image search (using the terms “new kitchens”). Based on that image, we researched various cabinets, appliances, color schemes and more. Of course there were countless changes worked into our final plan, yet our finished kitchen remains very similar to our original Google image search.
Regarding technical dimensions… because there are so many great online sources for proper kitchen “measurements” including counter-top height, working “triangle” layouts, etc., we’ll avoid all that. But make no mistake – do your homework on that stuff too (and of course your designer will help with those vital aspects).
Instead we’ll briefly discuss some of the less glamorous more basic elements of our kitchen remodeling. Specifically, we underestimated the challenges of new lighting, new electrical and new heating/cooling. Because our house was over 50 years old, those items were critical to our updating process… yet were never part of our original budgeting or planning. As we began the demolition, we discovered essentially all our kitchen wiring needed to be replaced (as well as all the outlets and switches),100% of all lighting needed to be redesigned, and all the heating / cooling work needed to be redone and re-flowed. Keep in mind: Very few contractors can anticipate these types of “hidden” problems when first estimating a remodeling job. For that reason it’s definitely a good idea to set aside a portion of your budget for these types of unforeseen (yet inevitable) needs and also discuss these potential needs in the original estimating process.
As anyone who has lived through a major kitchen remodel will tell you, two of your newest best friends will quickly become your kitchen designer and your installer. And not necessarily in that order. Both are critical to the process. We used Nu-Way Kitchen and Bath in Macomb for our design services as well as the purchase of our cabinets, sink and faucet. They were wonderful. Their design services were essentially “included” with our cabinet purchase. And their selection of “all things kitchen” was truly outstanding. We’ll tell you more about my installer (equally wonderful) in the next installment of this series.
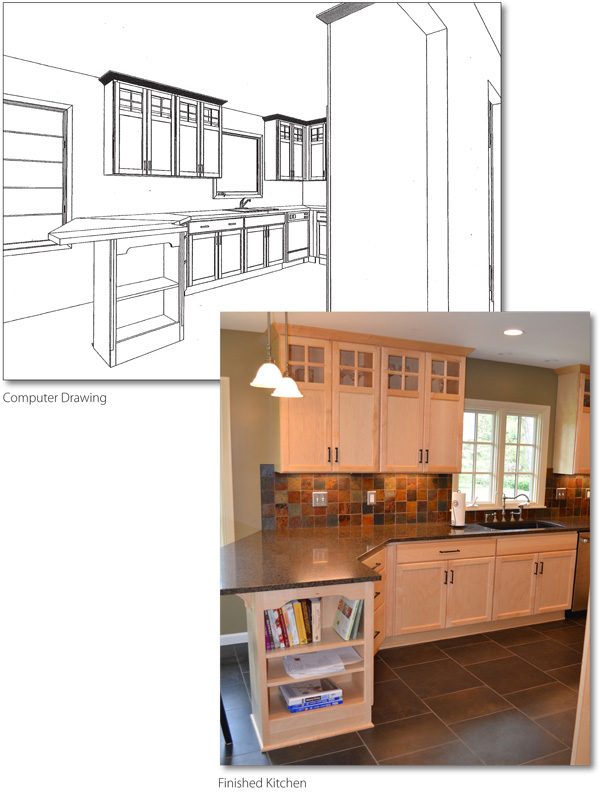
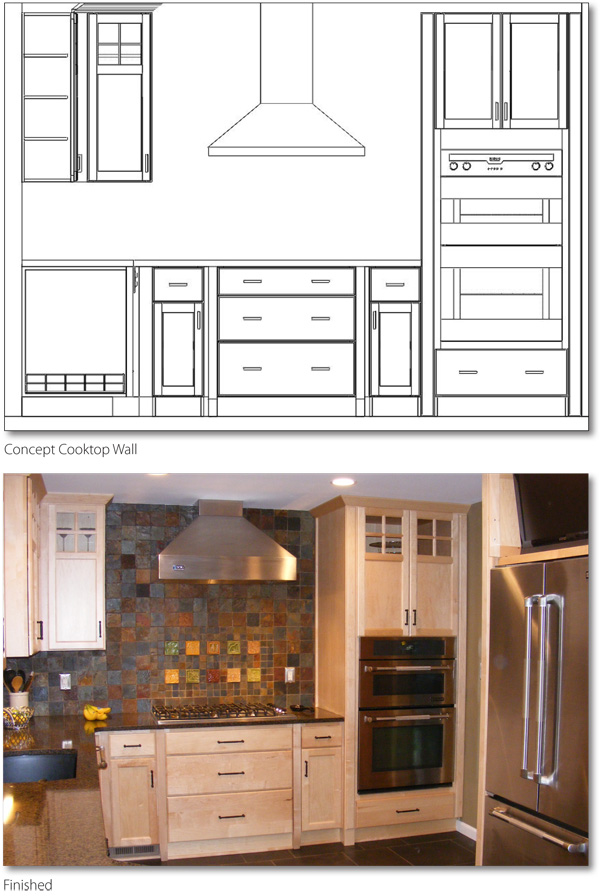
Regarding Nu-Way’s design services, below is their final floor plan and a few of the other computer-generated dimensional drawings we approved prior to ordering the cabinets and beginning construction. Along with those computer line drawings, you’ll see the same views of our finished kitchen. Another tip: Use these computer-generated drawings to help you visualize your new space from as many angles as possible. Nu-Way’s design services were extremely helpful in this regard. The software to do this is now readily available, it’s not expensive…and it definitely helps translate a two-dimensional floor plan into what a real three-dimensional kitchen can look like.
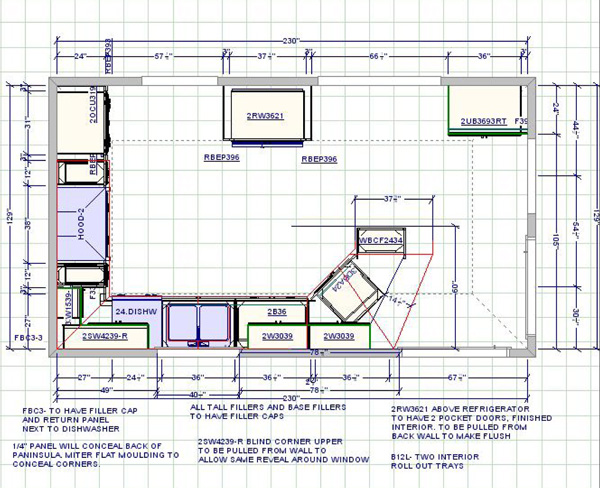
Nu-Way Original Floor Plan Proposal (our third revision)
In the next installment, we’ll talk more about the great Nu-Way services, my experience in selecting and working with a contractor, the demolition – and a few more tips for living through the entire process.
Notes for Installment #2: Nu-Way making things right (when they were wrong). The importance of references when selecting a contractor. Terms of the contractor working relationship. Flexibility “clause” (maybe a fixed fee for job and then an hourly fee for “extras”). Benefits of daily meetings during installation. Dumpster, window fan, plastic everywhere, seal off registers, planning and revisions, toaster, refrigerator and microwave in the basement, the challenges of “game-time” decisions and the need to be personally involved every step of the way, etc. opening the wall.