


For my third and final “dream kitchen” installment, I want to talk about the following:
• Cabinet installation
• The benefits of stainless appliances
• The importance of sealing the grout lines on the tile floor
• Adding personal touches to the tile
• The importance of our big pantry cabinet
• Our informal dining area
Cabinet Installation
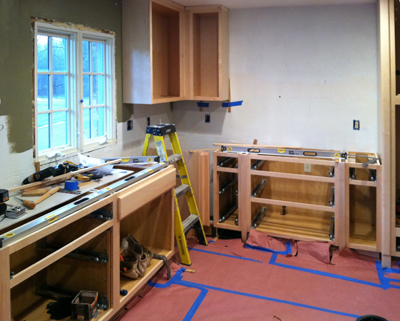
Installing our kitchen cabinets (at least from my “spectator” position) was like watching someone assemble a 200-piece life-size puzzle. It required patience, creativity, exceptional carpentry skills, heavy-lifting and more. One thing that definitely surprised me was how much space was required to store our packaged cabinets prior to installation. My kitchen is average size; 11’ X 19’ , yet the cardboard boxes containing the cabinets (and appliances) took up both sides of my two-car garage, half my kitchen AND my entire dining room. Good thing that type of space was available.

It was at this point in the remodeling process I truly realized the value of a professionally produced and detailed floor plan from a qualified kitchen designer. Without that floor plan, it would have been total chaos.
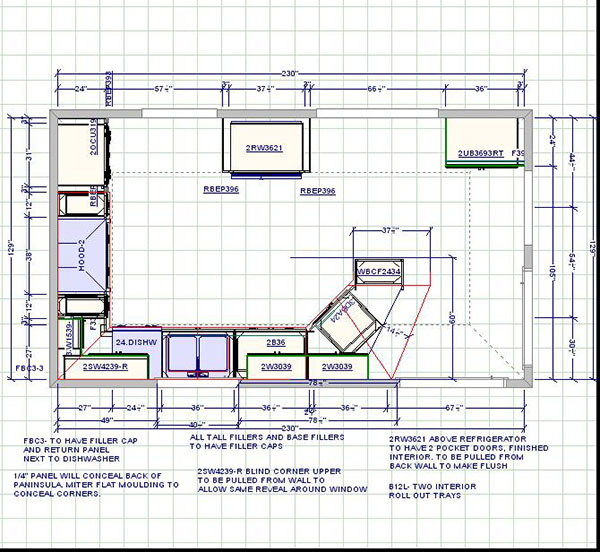
Even with the professional floor plan, it felt like chaos most days. All credit here goes to my outstanding cabinet installer. He was a true, hard-working pro with tons of experience. My advice: Don’t settle for anything less. Another point worth mentioning, we didn’t buy cheap cabinets. Yet I can say unequivocally they have been worth every penny. Don’t cheat yourself and go for the bargain chipboard stuff. Frankly, I wonder how those particle board cabinets ever make it through the rigors of the installation process! I’m not being snobby here. All I’m saying is your kitchen cabinets take a real pounding. Buy the good stuff.

The Benefits of Stainless Steel Appliances
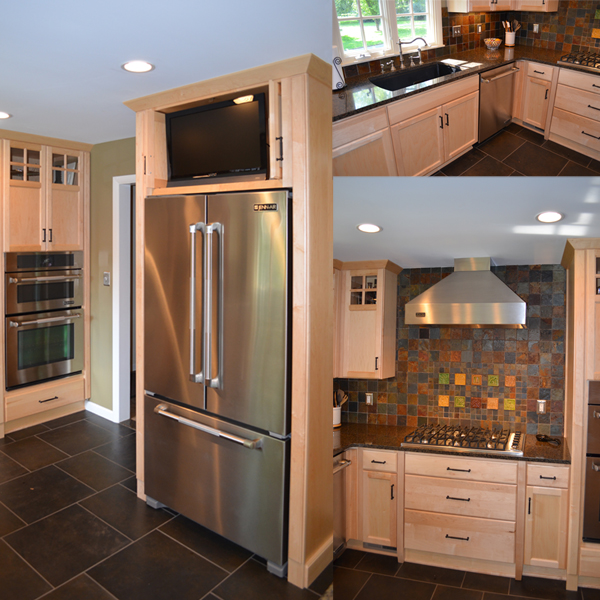
Not knowing the features and benefits of appliances and appliance finishes (and having never given it much thought) the idea of appliance shopping was not very appealing to me. However, after researching the fact that appliances amount to approximately 20% of the total kitchen remodel budget, I forced myself to learn more.
One quick decision we made was a natural gas, six-burner, easy-to-clean stainless steel cooktop. The benefits of cooking with gas are well documented:
• Accurate cooking temperatures
• Evenly distributed heat
• Less wasted heat than electric stoves
• Faster cooking time
• No power? Not a problem
Though we rarely use all burners, that cooktop size allows for plenty of room to shift pots for cooling / mixing, etc.
Regarding our oven, we’re still learning convection cooking (soggy banana bread last weekend), yet we look forward to its highly promoted benefits. The finish we selected for all our appliances (and faucet fixtures) was stainless steel. We chose stainless based on observations I’ve made over the years: Virtually every top restaurant and commercial kitchen I’ve ever seen ALL use stainless steel throughout for appliances and cabinets.
Simple product research tells us why:
• Stainless steel’s super-hard finish offers longer life
• Stainless is easier to sanitize and keep clean
• Stainless steel does not absorb dirt
• Stainless can be wiped down with a damp cloth
• Because stainless is non-porous, it resists bacteria and germs
• Stainless steel appliances “go” with almost any cabinet style
Bottom line: Stainless is worth it.
Sealing the Grout Lines
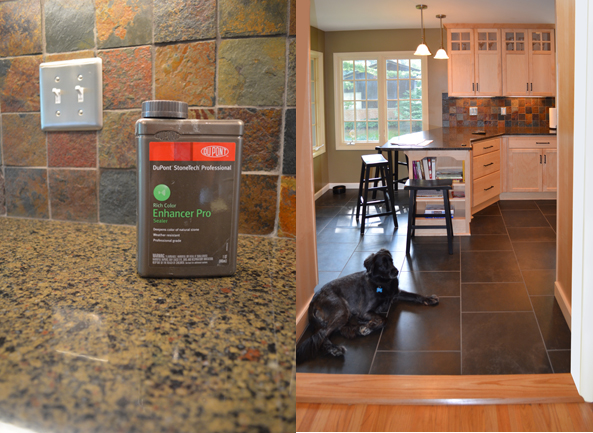
Sealing grout lines in the ceramic floor might seem like a small item in the “big picture” of a total kitchen remodel. Yet overlooking this small step would be a big mistake. Accidents happen. The grout lines in a kitchen ceramic tile floor are particularly vulnerable to stains from coffee, punch, wine, grape juice, grease, pets, dirt, oil, and more. Sealing the grout assures those mishaps will not create unsightly blemishes and uneven coloring in the grout lines.
After reading about the importance of sealing the grout (and to be 100% certain how to do it) I visited a commercial tile distributor and asked the guys in the “contractor” line what they recommended. Contractors love to be asked for their advice – and they were VERY helpful on tips and procedures.
The process is relatively simple. Yet, you should plan to set aside a full day to do it right. That’s because at least two applications are needed (maybe more), and the sealer should dry between applications. All directions are on the container and they’re easy to understand. NOTE: Don’t seal glazed ceramic tiles. They are non-porous and the sealant will simply leave ugly globs on the surface.
Most research I’ve read states grout cleaning and sealing should be repeated every six months.
The Personal Touch of Pewabic
Pewabic Pottery has been a Detroit tradition for over a century. Founded in 1903 at the height of the Arts & Crafts movement in America, Pewabic Pottery tile can be found throughout Michigan in prominent buildings including Christ Church Cranbrook, Holy Redeemer Church, Detroit’s Guardian Building, the Detroit Public Library, the new Comerica Ballpark, the Detroit Institute of Arts and more.
Pewabic tile is unique and beautiful…and truly Detroit “home grown.” For all these reasons and more, I wanted to include a few simple Pewabic tiles in my backsplash design.

I’m glad I did, I enjoy them EVERY DAY!
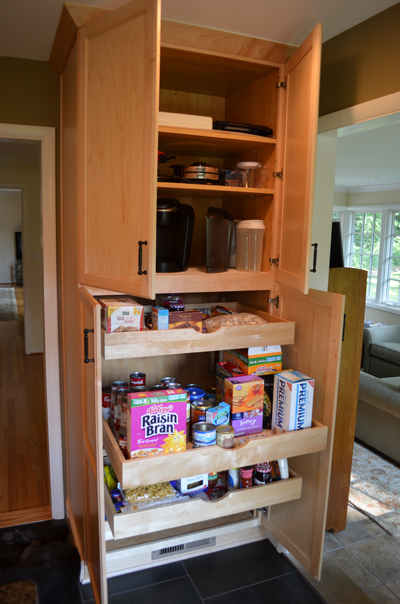
The Power of the Pantry
It’s no secret the efficient use of space is one of the most valuable features in kitchen design. For that simple reason we love our big pantry cabinet. Organizational freaks that we are, the roll-out drawers are essential for easy, day-to-day cooking. Without moving cans, boxes, and bags, we can quickly see all the contents of the pantry drawers with a few quick glances. We opted for the big storage space up above to hold the coffee maker (don’t like leaving it out on the counter), the juicer, the crock pot, the George Foreman, our waffle-iron, etc.
The secret to our pantry cabinet is that it required only about 12 square feet of floor space – yet it provides 96 cubic feet of floor-to-ceiling storage.
Informal Dining Area
Because we like to sit at the bar whenever we’re out to dinner, I wanted to include a similar countertop eating area in our new kitchen.
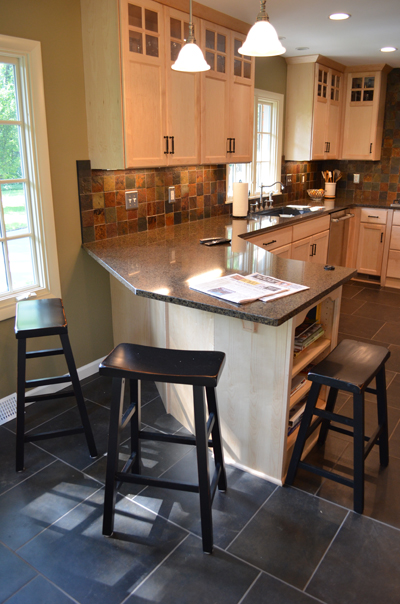
We did a little research and discovered the knee-clearance required for a 36” countertop is 15” and the required linear counter space for seating is 24” per person. We then added a few extra inches of counter depth to allow plenty of room for spreading out the paper and working on the computer.
And because our counter seating faces the working pattern of the kitchen, conversation during food prep is easy. One additional benefit is that meal serving to the counter is just a few steps from the cooktop and oven.
An unexpected benefit of the informal countertop dining area is that it quickly became the center-of-the-party for our family gatherings because it doubles as a great buffet table.